Saturday, May 4, 2024

Bella Blvd Celebrates iNSD 2024....


Welcome friends... today is iNSD 2024 and Bella Blvd is celebrating with lots of Scrapbook fun.... plus a fun card by ME. Today I am showing you how to use your scraps when creating a card. 

BUT FIRST...
Head on over to Instagram and hop along... 
there is a prize that you will not want to miss your chance to win. 


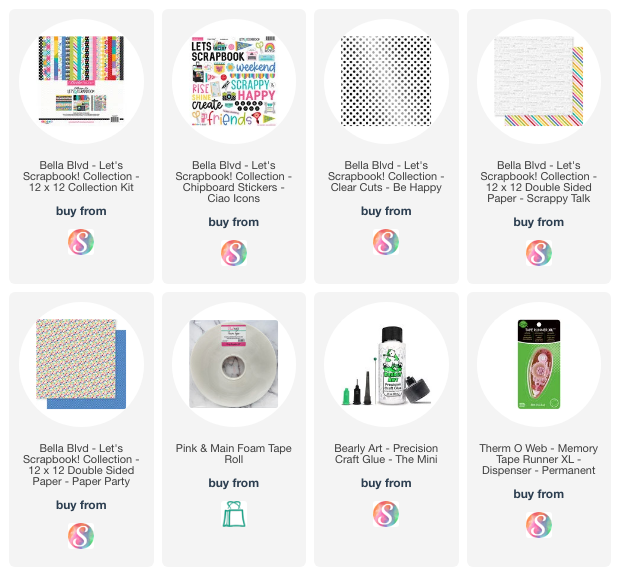
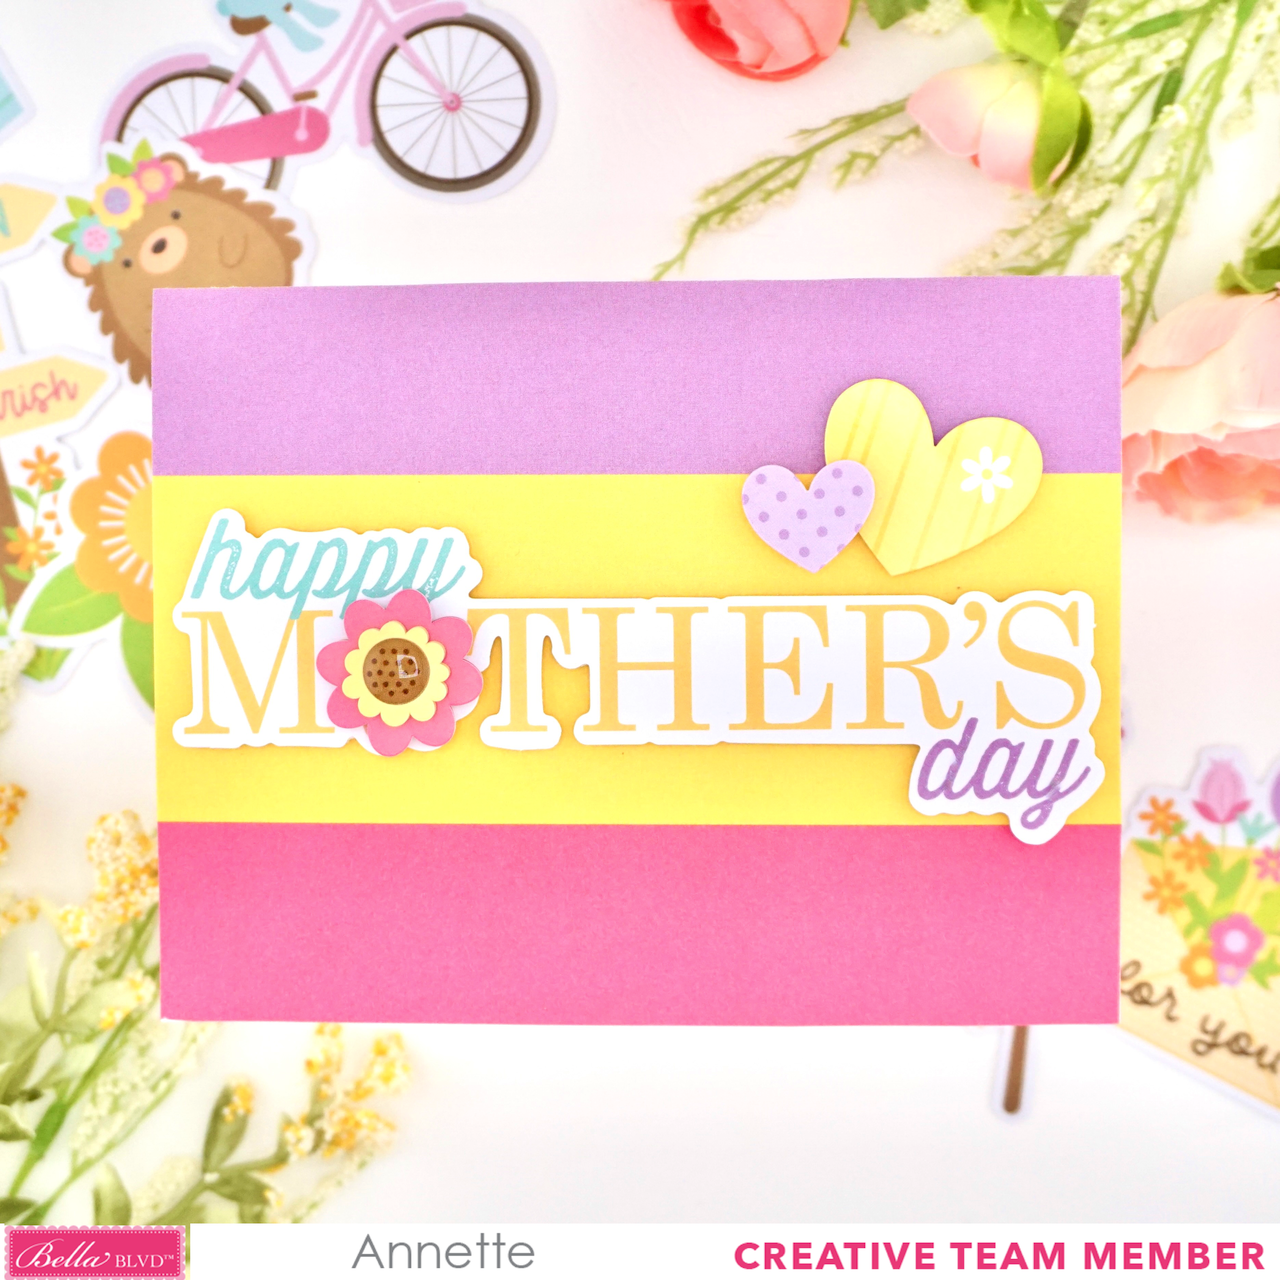
YAY! for cards even when we are celebrating Scrapbooking. When scrapbooking you always have scraps and we can find ways to create with them so they do not go to waste. So of course I have created a Bella card using the New Let's Scrapbook collection. 

My challenge for you today is to use those Stripes and Polka Dots scraps you have let over. 


Create card from white cardstock A2 size.

You can trim down to whatever size fits your left overs. I trimmed these Let's Scrapbook papers to 2 1/2 x 4 1/4 on the top and the bottom measures 3 4 1/4. For the top I used Paper Party backer paper and added the Clear Cuts Be Happy right on top. I love layering the Clear Cuts on the designer paper. For the bottom I used Scrappy Talk backer colorful stripes. 

Adhere these papers to your card using liquid glue. When you layer the Clear Cut using a clear tape runner that goes on clear. I used the Thermoweb tape runner. 


To hind that seam in the middle I cut one of the Borders and trimmed off the heart design. You can really use any of these borders. I would use whatever you have left over. It measures 1 x 4 1/4, so you really do not need a big piece.

I also fussy cut one of the hearts and popped it up in the center. You do not have to do this. I just love dimension. 


Using the Let's Scrapbook Ciao Chip board I added this sentiment. It is already sticky on the back but I added some foam tape to give it a little more dimension. 

To finish I added those fun Scissors also from the Ciao Chip board. 


That is always enough to create a card. 
You can even create a card to coordinating with your scrapbook page.. why not... Right?

Thank you for stopping by.
Have a wonderful iNSD celebration.

Wednesday, May 1, 2024

Stay Cool...


Happy May blog friends.. today I am all about the beach with this Waffle Flower card that I created using old and new, so let's get started.


Create card from white cardstock A2 size.

Cut a panel 4 x 5 1/4 on yellow cardstock and adhere to the card using liquid glue.

Stencil the Waffle Flower Duo-tone Squares using blue, purple and yellow inks. Any will do, I say use whatever company you love the most. Sprinkle a little Copic Opaque mixed with water on your stenciled background and let dry completely.

Die cut the Waffle Flower Postage Collage Die on your stenciled background and then add some foam tape to the back and adhere it to your card. Center the best that you can. 

Stamp out these fun images from the Waffle Flower Stay Cool stamp set on white cardstock using black ink and color the images using your favorite medium. Die cut the images using the coordinating dies. Now create a fun scene or just add them to your card for cuteness. 

Finishing with stamping the sentiment directly onto your background using black ink. 


Yes, to summer.. right? I am dreaming of beach time or pool time.. I'll take both.

Thank you for stopping by.
Have a wonderful day.

Tuesday, April 30, 2024

Bella Blvd: Just Because... Mother's Day Themed Cards


Welcome blog friends.. today I am sharing two Bella Blvd Mother's Day cards using the new Just Because Collection.  This collection is so beautiful and easy to create with so let's get started.


I know all our moms like flowers for Mother's day so this first card is filled with flowers that will last forever. I really love them sentiment because this is actually one of the things that my mom and I say to each other and then hang up the phone before the others says me more...
 

Create card from white cardstock A2 size.

Cut a panel on the Just Because Sing Me A Song backer Purple panel measuring 5 1/4 x 4 and die cut or cut a 3 inch oval in the center. Now add some foam tape to the back and adhere it to your white card base.
  

Choose some of the pretty Just Because Ephemera Icons and one of the Doohickey sentiments to go with the bella-pops Flower Garden and create a scene that your mom will love. I used foam tape on the Ephemera Icons for little dimension and then added the Flower Garen bella-pop in the center. 

Finishing with this adorable little bee and the sentiment. Hope my mom likes it...


Next up we have more of a simple card that really sends the message of Happy Mother's Day!


Create card from white cardstock A2 size.

Cut a panel on the Just Because Hello paper and adhere it to your card base using liquid glue.

Pick out the Happy Mother's Day sentiment from the Just Because Ephemera Words and add some foam tape to the back and adhere it to the center of your card.

Add one of the bella-pops Full Bloom flowers to the O on the Mother sentiment.

Pick out two of the hearts from the Just Because Ephemera Icons, add some foam tape to the back and adhere it to the upper right hand side of the card.


With this gorgeous Just Because collection you can really create colorful and fun cards that will always bring a smile to the person you are creating for.

Thank you for stopping by.
Have a wonderful day!

Saturday, April 27, 2024

Pretty Pink Posh... Thank you...


Happy Saturday blog friends.. today I am sharing another fun Pretty Pink Posh card that is full of sparing fun and my favorite flower, the Tulip. So let's get started, shall we?


Create card from white cardstock A2 size.

Die cut the Tulip from the Pretty Pink Posh Big Easter Cupcake die set on pink and red cardstock for the flower and green for the stems. Die cut 15 stems and 13 flowers and fill a white panel A2 size until your background is full of tulip fun. Adhere your panel to your card base using liquid glue.

Die cut the smallest Eyelet Rectangle die on white cardstock and stamp the Thinking of You sentiment from the Bee Friends stamp set using embossing ink and heat embossing with gold embossing powder. Ink blend a little pink at on the lower half of the rectangle. Add some foam tape to the back and adhere it to your card. 

Stamp out a few bees from the Bee Friends stamp set and color using your favorite medium and die cut them using the coordinating dies. Adhere them to your card using foam tape. 


Now I think this will for sure brighten someone's day.... don't you think? Tulips galore.... yes please. 

That is all for today.

Make sure to follow Pretty Pink Posh on Instagram for more fun inspiration. 

Friday, April 26, 2024

Bloom...


YAY! for Friday.. I have been back from my trip almost a week and I am ready to go on another. It is nice not having to clean up after yourself or cook and wash dishes.. LOL If you did not know I went on an Alaskan cruise last week and it was fantastic. Perfect weather and just loved every minute of it. 

Today I have created a card using Picket Fence Studios. I just love this set, so let's get started. 


Create card from white cardstock A2 size.

Die cut this cool  Picking Shear A2 cover plate die on black and white striped paper. This paper is from the MFT Black & White Strips 6x6 paper pad. Add some foam tape to the back and adhere it to your card base.

Stamp out two of the Picket Fence Studios Brighter Days Gerbera Daisy on white cardstock using black ink. Stamp the flower on an A2 panel and only stamp in the corners and then color using your favorite medium. Die cut the flowers using the coordinating dies. Since we only stamped on the edges of an A2 panel your will not need to trim off any edges. Just die cut and line up on our die cut panel and adhere to your card. On the lower flower add foam tape and on the top flower use liquid glue. I then added some NUVO Crystal Drops Simply White in the center of the flowers. Make sure to let dry completely before handling. 

Stamp out these fun sentiments from the same set Brighter Days Gerbera Daisy on white cardstock using black ink and then die cut using the coordinating dies. Adhere to the card using some foam tape. 

Finishing with a little sparkle from the Spellbinders Paper Arts Color Essentials Gems. 


So simple... just a bit of coloring and really that was not that hard. I used two Copic markers and then I was done. 

That is all for today.
Thank you so much for stopping by.

Have a wonderful Friday!

Wednesday, April 24, 2024

Pretty Pink Posh: So COOL...


Happy hello blog friends.. Today I have another fun Pretty Pink Posh guest designer post to share with you all. Today I had my nephews in mind when I created this card, they are both surfers. 


Create card from white cardstock A2 size.

Cut a panel 4 x 5 1/4 on kraft cardstock and stencil this awesome Layered Surf Boards stencil using colors that you love. The colors I used are listed below. Adhere the panel to your card base using liquid glue.

Stamp out this adorable lion from the Summer Fun stamp set on white cardstock using black ink. Color the image using your favorite medium. Stamp one of the sentiments from the same set and die cut using the coordinating Summer Fun die set. Add some foam tape to the back and adhere it to the card in the lower right hand side. 


Super easy and super fun.... don't you just love that cool surf board background? I need to send this card to my nephew now.
 That is all for today.
Make sure to follow Pretty Pink Posh on instagram for more fun inspiration. 

Have a wonderful day and thank you for stopping by.

Tuesday, April 23, 2024

This Calls for Confetti.... Happy Birthday!


Hello sweet blog friends... This Calls for Confetti just released some new Stamp and Dies that you must check out. Today I am showcasing two of them, so let's get started.


Create card from white cardstock A2 size.

I used the NEW Happy Layering Die Set. I used the second largest rectangle to die cut one of the This Calls for Confetti Painted Patterns designer papers. Adhere this rectangle to the card base using liquid glue. 

Die cut the 4th largest rectangle on another of the This Calls for Confetti Painted Patterns designer papers and add some foam tape to the back and adhere it to your card, center it the best you can. 

I ink blended Ranger Oxide inks Festive Berries and Salvaged Patina on a piece of white cardstock. Die die cut it using the Happy Layering die set rectangles. Stamp the sentiment from the NEW Happy Sentiments stamp set using black ink. Add some foam tape to the back and adhere it to your card. 


So simple and fun with these cool Painted Patterns designer papers. Plus how much do you love this sentiment. Make sure to check it out because it is interchangeable. You could say HAPPY ..... in many ways and this set offers lots to choose from. 

Thank you for stopping by.
Have the most awesome day.

Saturday, April 20, 2024

This Calls For Confetti: Release day


Welcome friends.. Today is the This Calls for Confetti release and it is such a sweet release. I hope that you will check it out. We are also having a hop on Instagram. 


Create card from white cardstock A2 size.

On a white panel, ink blend Ranger Oxide inks Wore Lipstick, Shaded Lilac and Tattered Rose. Splatter some Copic opaque mixed with water on your ink blended panel. Die cut the NEW Elongated Ovals A2 Cover Plate on your ink blended panel. 

Adhere a piece of This Calls for Confetti A2 Acetate Sheet using tear tape to the back of your die cut panel. Make sure to take off the protectant layer before you adhere it to your panel. 

Add some Double-sided Adhesive Foam Strips to the back of the panel on top of the acetate. Make sure to only put the strips where you can not see it on the front. This will be our shaker area. 


Peel the protectant layer on the foam tape and adhere a white panel to the back. 

Adhere your shaker panel to your card base. 

Stamp out these pretty new images from the Alices Story stamp set. For the flowers I stamped out with black ink and added a little color and for the vase I used Waffle Flower Daydreaming ink. (sorry not sold anymore so I hope you already own it because it is a great color) Die cut the images using the coordinating Honeysuckle die set. Add these pretty images to your card using foam tape.'

Stamp out the sentiments from the Alices Story stamp set on white cardstock using black ink and then die cut using the coordinating dies. Adhere to the card. 
 

Make sure to check out the entire release because it is fabulous.

Thank you so much for stopping by.